8 November 2026 · Soldr
ESP32 won't boot with something on GPIO 0, 2, 12 or 15
Short answer: GPIO0, GPIO2, GPIO5, GPIO12 and GPIO15 are strapping pins. The ESP32 reads their levels at the moment it resets, and those levels choose the boot mode and, for GPIO12, the voltage of the flash chip. A sensor, button or pull resistor that holds one of them at the wrong level during reset can stop the board from booting or uploading. Move that part to a different pin.
It's a confusing failure because the wiring is often correct and the code is fine. The board just won't start, or uploads stop working, as soon as a certain part is connected. Unplug the part and it boots. The datasheet explains why, and our ESP32-WROOM-32 and ESP32-DevKitC reference pages mark these pins.
What the datasheet says
From the ESP32-WROOM-32 datasheet, section 3 (Boot Configurations), as cited on our reference page:
- GPIO0 and GPIO2 select the boot mode: normal start from flash, or download mode, which waits for a new upload.
- MTDI, which is GPIO12, sets the VDD_SDIO voltage, the supply for the flash chip inside the module.
- GPIO15 (MTDO) and GPIO5 are also strapping pins, marked as such on the DevKitC's pin table.
- Separately, GPIO6 to GPIO11 connect to the module's own flash and shouldn't be used at all, and GPIO34 to GPIO39 are input-only.
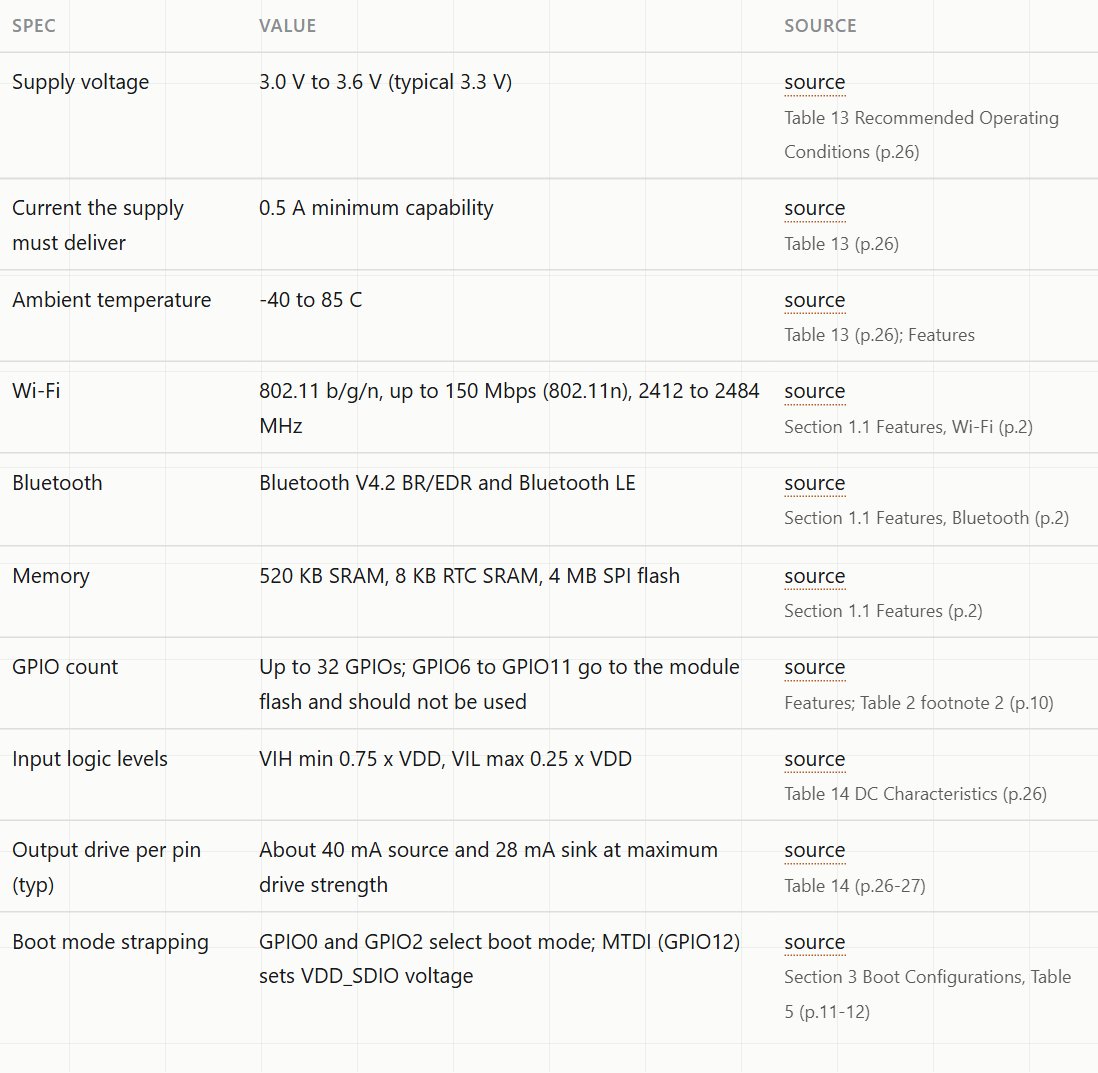
The key phrase is "at reset". After the chip has booted, these are ordinary GPIOs. The trouble is anything that forces their level during the moment the board powers up or restarts.
Symptoms and the usual culprit
- The board sits waiting for an upload instead of running your sketch. GPIO0 is being held low at reset: a button to ground, a module output, or a pull-down on that pin.
- Uploads fail, but the sketch runs once it's already flashed. GPIO2 is pulled high by something attached, so the chip can't enter download mode cleanly.
- The board resets in a loop or won't start from flash at all. GPIO12 is pulled high at reset. On a module whose flash runs at 3.3 V, that strap can select the wrong flash voltage.
- Odd boot messages, or a sensor that reads wrong only after a reset. A part on GPIO15 or GPIO5 is driving the pin at power-up.
Parts that cause this are often ones with their own pull-up or pull-down resistors: some sensor modules, button boards, relay boards, and I2C modules whose pull-ups land on a strapping pin.
How to fix it
- Move the part to a non-strapping pin. On an ESP32 DevKit that leaves plenty of choice: for example GPIO4, GPIO13, GPIO14, GPIO16 to GPIO19, GPIO21 to GPIO23 and GPIO25 to GPIO27 for outputs, and GPIO34 to GPIO39 for inputs that only need to be read.
- If you must use a strapping pin, use it for something that doesn't pull it during reset, like an LED through a resistor that only lights once your code drives it. Check the datasheet's required level for that pin first.
- Never use GPIO6 to GPIO11. They're wired to the flash inside the module.
- Disconnect, test, reconnect. If the board boots with a part removed, that part's pin is your suspect.
Other ESP32 chips have their own strapping pins
The list above is for the original ESP32. Other chips differ. For the ESP32-C3, the datasheet names GPIO2, GPIO8 and GPIO9 as the pins that select the boot mode. The ESP32-S3-DevKitC-1 has its own list too, including GPIO0. Look up the chip on your board before you reuse a pin plan from another ESP32.
How Soldr picks pins
When Soldr plans a build, it assigns pins from the board's published pinout. Some strapping pins are still normal choices for certain jobs. GPIO5, for example, is the default chip-select of the ESP32's VSPI bus, and a screen's chip-select line sits high when idle. So read the pin list at the top of the sketch before you wire, and if a part you're adding pulls a strapping pin at reset, ask for it to be moved ("move the button off GPIO0"). If you plan your own pins, put them in the prompt. More on prompts in how to describe a hardware build to an AI.
Boards on Compoden: the ESP32-DevKitC and the bare ESP32-WROOM-32 module. If your board boots but resets when a motor or servo starts, that's power, not strapping: see powering servos and the power budget guide.
Describe your build on app.soldr.ai. Sign in and get 100 credits free.