8 November 2026 · Soldr
How to describe a hardware build to an AI code generator
Short answer: start with "I want to build a ... with ..." and name the board and the main parts. Describe what it should do, with numbers where you have them. Add the facts only you know: I2C addresses, how it's powered, any pins that are taken. Then change the build one step at a time: "add a buzzer", "swap the OLED for a TFT".
An AI code generator for hardware has to choose real parts, give each one a pin, check power and logic levels, and write code that matches all of that. Every gap in your description is a guess it has to make, or a question it has to ask. These tips come from building on Soldr ourselves this week. Most of them apply to any tool of this kind.
1. Lead with "I want to build ... with ..."
Name the thing, the board and the key parts up front, and the tool has what it needs to start:
I want to build a weather display with an ESP32, a DHT22 and a 0.96 inch OLEDIf you leave the board out, Soldr asks before it picks any parts. Our Dhanteras greeting screen started that way:
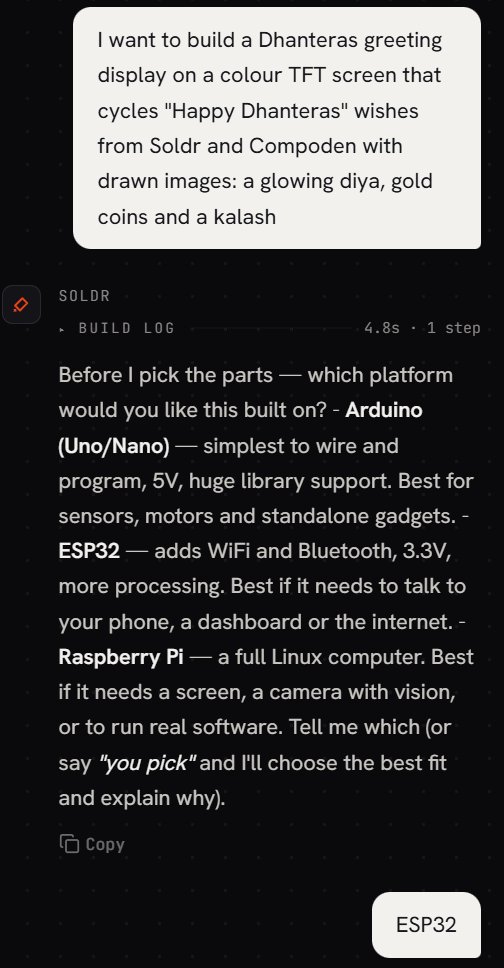
That's a fine answer from the tool, but it costs a round trip. Answer with one board name ("ESP32"), or say "you pick" if you really don't mind and want it to explain the choice.
2. Describe behaviour, with numbers
"Make the LEDs do cool patterns" leaves everything to the tool. Compare:
3 patterns, 8 s each: running light, bounce, odd/even blink, with a boot self-test that pulses each LED onceEvery number in that line became a named constant in the sketch Soldr wrote (PATTERN_MS = 8000), so you can find it and change it later. The same goes for screens and sensors: say what it should show, how often it should read, what should happen when a value crosses a line.
3. Add the facts only you know
Some details live on your bench, not in any catalogue. Say them:
- I2C addresses, if you know them. We built a desk toy with an ESP32, an MPU6050 and an OLED twice. Without addresses, Soldr answered with "Fix this first: I could not verify the OLED and MPU6050 I2C addresses". With "an MPU6050 at I2C address 0x68 and a 0.96 inch SSD1306 OLED at 0x3C, both on one I2C bus", it built and compiled the sketch. More on addresses.
- How it's powered. "Powered from USB only", "runs on a 9 V battery" or "has its own 5 V supply" changes the parts and the power plan. See the power budget guide for why.
- What's already in use. If a shield or another circuit takes some pins, say which.
- Parts you already own. Name them, so the build can account for them.
4. Say what you'll see, not a figure of speech
A tool that turns words into parts takes words literally. If a word could name a real component, it might get one. Describe the effect in plain terms: "golden sparks shooting upward on the screen" is clearer than a word that also names a piece of hardware. And if a part shows up that you didn't ask for, say "remove the ..." (see the next tip).
5. Change the build one step at a time
After the first build, edits work best as short commands about one part:
- "add a buzzer"
- "remove the relay"
- "swap the OLED for a 2.4 inch TFT"
- "can you add a button to change the pattern?"
Avoid "no buzzer" as a way of removing something; say "remove the buzzer". Each change updates the build, and the build keeps a history you can step back through.
6. Ask questions as questions
End a question with a question mark and you get an answer instead of a change: "why did you pick the ESP32 over the Uno?" If something isn't working, name the part: "the OLED is blank" gets you checks for that part. "The code is not working" goes to the code.
7. Keep one build per idea
If the project changes direction (a different board, a different main sensor), start a new build rather than editing the old one into something else. A fresh description gets a fresh parts list, pin plan and power plan, without leftovers from the first idea. Keep editing for refinements: a part added, a timing changed, a screen swapped. That also keeps each build's history readable, so you can see which change caused what.
8. Check the result like an engineer
Whatever tool you use, read what comes back before you buy or wire anything:
- Parts: is everything there, and nothing extra?
- Pins: compare the pin list at the top of the sketch with how you'll wire it. The code is what runs.
- Power: does the supply cover the peaks, not just the steady draw?
- Compile: look for a clear verdict. Soldr compiles the exact sketch and says whether it compiled, or that it fixed an error first.
- Serial Monitor: after flashing, read the startup lines. Here's how.
Not sure which parts to name? Our board and component reference pages list specs and pinouts with their sources, and each ends with project ideas that open Soldr with a ready-written prompt. Parts used in the examples, on Compoden: ESP32-DevKitC, MPU6050 module, 0.96 inch OLED.
Try a prompt on app.soldr.ai. Sign in and get 100 credits free.