6 November 2026 · Soldr
Arduino project maker: from idea to parts list, wiring and code
Short answer: an AI Arduino project maker should take one plain-English idea and give you four things that agree with each other: a parts list of real modules, a power check, step-by-step wiring and code for those exact pins. Soldr does all four on app.soldr.ai, then compiles the code and can flash it from Chrome or Edge, with no IDE to install.
Most "project ideas" lists stop at the idea. The hard part of an Arduino project is everything after it: which sensor, which pins, what powers it, and code that matches the wiring you actually did. Here's what a project maker should hand you, using a real build: a water-quality (TDS) meter on an Arduino Uno with a 16x2 LCD.
1. A parts list you can buy
Start with the idea in plain words, for example "I want to build a water quality meter with an Arduino Uno and an LCD". The first thing back should be a list of specific modules, not categories.
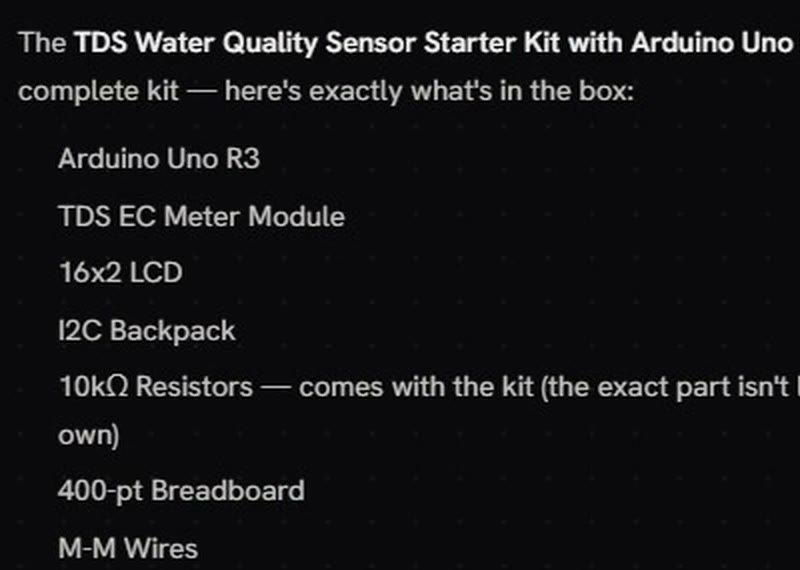
Every part Soldr picks is one Compoden stocks. If you already own some parts, say so and the build uses them. Starting from a Compoden kit? The kit page has an "Open this project in the Soldr app" link that sets up the same build with exactly what's in the box.
2. A power check
Before you wire anything, the project maker should add up what the parts draw and say what powers them.
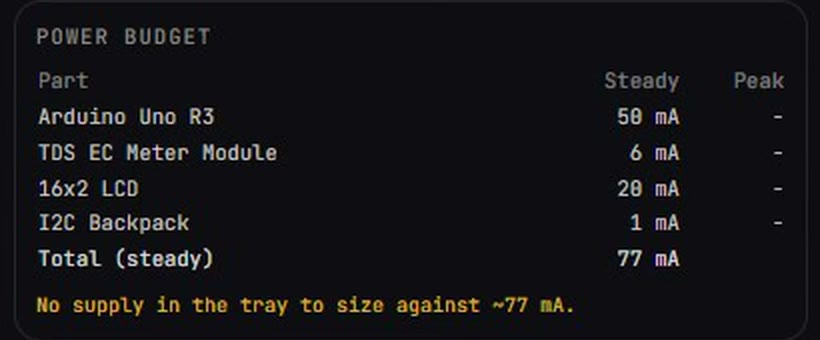
This one also says there's no supply in the tray to size against. That's correct: the kit has a 9 V battery snap but no battery, so you choose what powers it. An honest "I can't size this" beats a confident wrong answer.
3. Wiring, step by step
Next, the wiring: one part at a time, ground first, then power, then signal, each wire named on both ends.
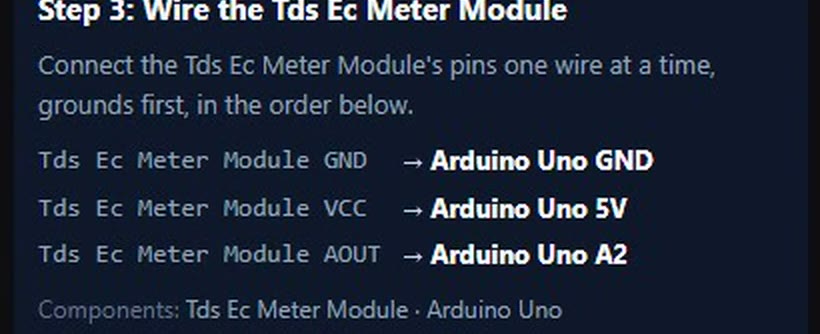
For this build the steps include soldering the I2C backpack onto the LCD (pin 1 to pin 1), the backpack on A4 and A5, the TDS module on A2, and the battery snap on VIN. There's also a Wiring Table and a full schematic for the same connections. The AI wiring diagram generator page explains how they're made.
4. Code that matches the wiring
Last, the code, written for the pins in the wiring, not for a generic example. Soldr generates the wiring and the code from one pin plan, compiles the exact sketch and shows the result. As a guest you get a hardware test sketch that checks your wiring; sign in for the full project code. Sign in and get 100 credits free.
The code lives in an editable Firmware tab: you can edit it, recompile in your browser, and flash supported boards from Chrome or Edge. Step by step: uploading code from the browser.
How to describe a project so the result fits
The clearer the idea, the closer the first build lands. Four things make the biggest difference:
- The board you have. "with an Arduino Uno" or "with an ESP32" changes the pins, the logic voltage and what the code can do (an ESP32 has Wi-Fi; an Uno doesn't).
- What it should sense, and what it should do about it. "beeps when the water reading goes above a threshold" gives the code a job, not just a parts list.
- How it shows you things. An LCD, an OLED, a buzzer, LEDs, the Serial Monitor or a phone page.
- What powers it. USB from a laptop, a battery, or a wall adapter. If you don't know, say so and read the power check.
Then change it in plain words. "Use an OLED instead of the LCD" or "I already have a DHT22" updates the parts, the wiring and the code together.
Common first-project mistakes this catches
- A sensor with no pull-up or the wrong voltage. The parts list names the exact module, so its needs are known.
- Two parts on the same pin. Pins are assigned once, from one plan.
- Motors on the board's own 5 V pin. The power check flags it, and robot builds give the motor driver its own supply.
- Code written for different pins than the wiring. Both come from the same pin plan.
Projects you can start from
Each of these Compoden kits opens in Soldr from its kit page, with the parts, power check and wiring ready:
- TDS water quality sensor kit (Uno, TDS module, 16x2 LCD)
- Forest fire early warning kit (Uno, flame sensor, buzzer, LEDs)
- Obstacle avoiding robot kit (Uno, HC-SR04, servo, L298N)
- Line follower junior kit (Nano, two IR sensors, L298N)
- Clap controlled robot kit (Uno, KY-038 sound sensor, L298N)
Or start from nothing: describe your own idea. For a deeper walk-through of one build, read a workflow that doesn't fry boards, and for picking a tool, what to look for in an AI for Arduino coding.
What to check yourself
- Your parts match the list. A different module can have a different pinout; say so before wiring.
- The power source suits the total. If the tool can't size it, choose one with headroom.
- You wire with the board unplugged, and check each wire against the step before powering up.
Questions
What is an Arduino project maker?
A tool that turns a project idea into a parts list, a power check, wiring steps and code for the same pins. Soldr also compiles the code and flashes it from the browser.
Can it suggest a project for me?
Describe what you want it to do, or start from a Compoden kit page and open the project in Soldr.
Do I need to know how to code?
No, but it helps to read the code. You can edit it in the Firmware tab and recompile in your browser.
What does it cost?
Questions are free; code and compiles cost credits. Sign in and get 100 credits free.