6 November 2026 · Soldr
Generate Arduino Uno code from plain English
Short answer: describe what your Uno should do, in plain English, on app.soldr.ai. Soldr picks the parts, assigns Uno pins that suit each one (analog pins for analog sensors, A4/A5 for I2C, PWM pins for motor speed), shows how to wire them, writes the code for those pins and compiles it. Then flash the Uno over USB from Chrome or Edge, with no IDE to install.
"Write Arduino code for a TDS sensor and an LCD" gets you a sketch. Whether it runs on your Uno depends on things the sentence never said: which pins, which LCD, which library, what powers it. An Uno-aware code generator answers those first. Here's how that looks on real Uno builds, and the Uno details worth knowing either way.
Describe the behaviour, name the board
Good prompts say what should happen and name the board: "I want to build a water quality meter with an Arduino Uno that shows the reading on an LCD." You don't need pin numbers; that's the generator's job. If you've already wired something, say which pins you used and the code is written for those instead.
What an Uno-aware generator gets right
Analog sensors on analog pins
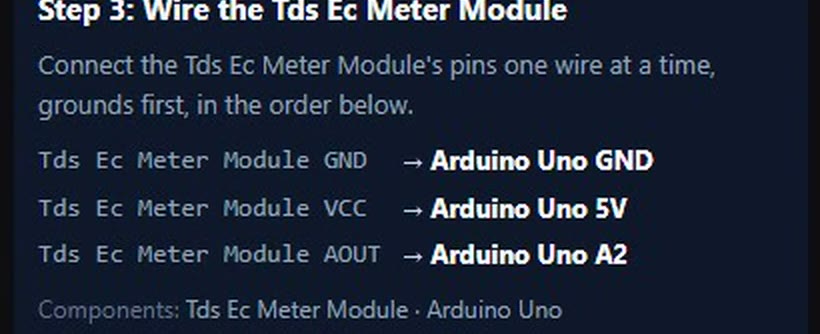
The Uno reads analog voltages on A0 to A5 with a 10-bit converter. An analog sensor's output belongs there. In our TDS build, the module's AOUT goes to A2:
More on what that resolution means: ADC resolution, 10-bit vs 12-bit.
I2C on A4 and A5
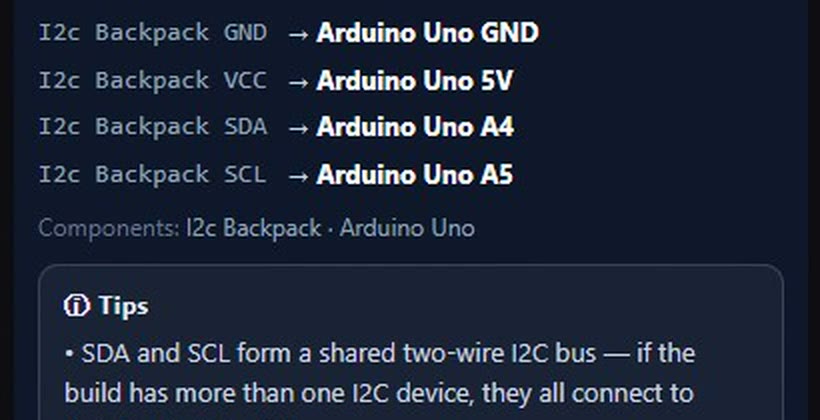
On the Uno, the I2C bus is SDA on A4 and SCL on A5. Every I2C part shares those two pins; they're told apart by address. The same build's LCD backpack:
PWM pins for anything that needs a speed or brightness
Only pins 3, 5, 6, 9, 10 and 11 on the Uno can do PWM with analogWrite. A motor driver's enable pins need them to set speed. In Soldr's Uno robot kits they land there: the obstacle-avoiding robot's L298N uses ENA on 5 and ENB on 6, and the clap-controlled robot uses ENA on 3 and ENB on 5. How PWM works.
Keep pins 0 and 1 free
Pins 0 and 1 are the Uno's serial lines, shared with USB. Parts on them can interfere with uploading and the Serial Monitor. The builds here start at Pin 2, which is a good habit in any Uno project.
5 V logic, and the parts that aren't
The Uno runs at 5 V. Most hobby modules are fine with that, but some parts are 3.3 V only. A good generator notices: in Soldr, a part on the wrong logic level gets a divider, a level shifter or a note.
Power that isn't the Uno's 5 V pin
The Uno's 5 V pin can run sensors and an LCD; it can't run motors. Soldr's robot kits give the motor driver its own supply from the battery holder, and every build has a power check. The classic symptom when this goes wrong is a board that resets as the motor starts: here's why.
Uno, Nano or ESP32?
If you haven't bought the board yet, the choice shapes the code:
- Arduino Uno: 5 V logic, sturdy, easy to wire on a breadboard, and the most example code. Six analog inputs, six PWM pins, no Wi-Fi.
- Arduino Nano: the same chip as the Uno in a smaller board that plugs into a breadboard. A Nano with the new bootloader may need the Arduino IDE to flash.
- ESP32: 3.3 V logic, much faster, Wi-Fi and Bluetooth built in, more pins, but some of them affect how the board boots. Good when the project needs a phone or network.
Describe the project and Soldr picks a board, or tell it the board you have.
A worked example: the TDS meter's code needs
For the water-quality meter, the code has three jobs: read the TDS module's analog voltage on A2, turn it into a reading, and print it on the 16x2 LCD over I2C. The generator has to know the LCD sits behind an I2C backpack (so it uses an I2C LCD library and an address), that A2 is analog, and that the LCD runs at 5 V like the Uno. Those details come from the parts list and the wiring, which is why the code is written last.
From code to a running Uno
Soldr compiles the exact sketch for the Uno and shows the result. A compile costs 5 credits. The code is in an editable Firmware tab: change it, recompile in your browser, then flash the Uno over USB from Chrome or Edge. Prefer the Arduino IDE? Download the sketch.
New to this? Flash the hardware test sketch first to check your wiring, then the full project. The whole routine is in using AI to write Arduino code without frying boards.
Parts from these examples
- Arduino Uno R3
- 16x2 I2C character LCD (PCF8574 backpack)
- TDS water quality sensor kit, with every part of the example build
More tools: the Arduino code generator and the online Arduino IDE. Getting started with Soldr itself: how to use Soldr.
Questions
Can AI generate Arduino Uno code?
Yes. Describe what it should do and name the Uno; Soldr assigns pins that suit each part, writes the code for them and compiles it.
Which pins should I avoid on an Uno?
Keep pins 0 and 1 free; they're the serial lines shared with USB. Use PWM pins (3, 5, 6, 9, 10, 11) for speed or brightness, and A4/A5 for I2C.
Can I flash the Uno without the Arduino IDE?
Yes. The Uno flashes over USB from Chrome or Edge on a computer, with no IDE to install.
What does it cost?
Questions are free; code and compiles cost credits. Sign in and get 100 credits free.