6 November 2026 · Soldr
Already use the Arduino IDE? Where an AI tool fits
Short answer: keep the Arduino IDE. Use an AI tool like Soldr for the parts of a build the IDE doesn't do: choosing parts, assigning pins, checking power, drawing the wiring and writing a first sketch that matches it. Soldr tells you the board setting and the libraries to install, so you can copy or download the sketch and carry on in the IDE, or compile and flash it from the browser instead.
If you already have the Arduino IDE set up, with board packages installed and a library folder that works, you don't need to replace it. The IDE is a good editor, compiler and uploader. What it doesn't do is design: it won't tell you which sensor to buy, which pin it should go on, whether your supply can run the motors, or whether your wiring matches your code. That's the gap an AI tool for Arduino fills.
What each tool is good at
| Job | Arduino IDE | Soldr |
|---|---|---|
| Pick parts for an idea | No | Yes, from parts Compoden stocks |
| Assign pins and check them | No | Yes (boot pins, buses, logic levels) |
| Power check | No | Yes |
| Wiring steps and schematic | No | Yes, from the same pin plan as the code |
| Write a first sketch for the build | No | Yes |
| Edit, compile, upload | Yes | Yes, in the browser |
| Any library or board you install | Yes | The boards and parts it supports |
| Work offline | Yes | No |
The handoff: from Soldr to your IDE
The point where the two meet is the sketch. Soldr's reply tells you what the IDE needs to build it. Here's the one for an ESP32 weather display:
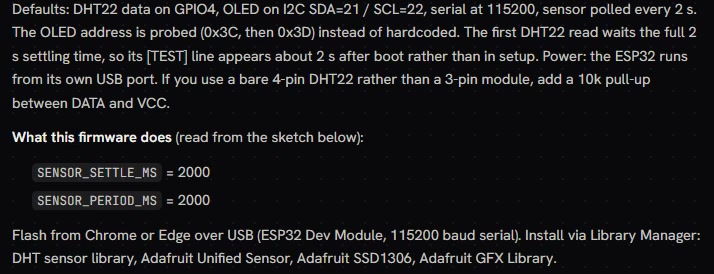
That's everything you'd otherwise dig out of the code by hand:
- The board setting: here, ESP32 Dev Module, with serial at 115200 baud.
- The libraries: install these four from the Library Manager.
- The defaults: which pin each part is on, and the timing values the sketch uses.
Copy the sketch from the Firmware tab, or download it, open it in the IDE, install the libraries and upload as usual. The wiring is in the sketch's header too, generated from the same pin plan as Soldr's Wiring tab, so you can check it on your bench.
If the IDE won't compile code Soldr compiled, it's almost always a board package or library version difference. Here's how to line them up.
Common handoff snags, and the fix
- Missing library. The IDE stops at the first #include it can't find. Install each library the reply names from the Library Manager.
- ESP32 board not listed. The IDE needs the ESP32 board package before "ESP32 Dev Module" appears. Install it from the Boards Manager first.
- Garbled Serial Monitor. Set the Serial Monitor to the baud rate the reply gives (115200 here). A mismatch looks like random characters.
- Blank display. Many 0.96 inch OLEDs use I2C address 0x3C, some 0x3D. In this example the sketch probes both rather than assuming one, which is worth keeping if you rewrite it.
- Different pins on your board. If your wiring differs from the plan, change it in Soldr first so the code is regenerated for your pins, rather than editing pin numbers by hand in two places.
Or skip the IDE for this build
For a quick test, or on a computer without the IDE, you can compile and flash from the browser. Soldr compiles the exact sketch on its server, and Chrome or Edge flashes Uno, Mega, Nano and ESP32 boards over USB (a Nano with the new bootloader may need the IDE). You can edit the code and recompile in your browser too. Step by step: uploading code from the browser.
A workflow that uses both
- Describe the build on Soldr. Check the parts list and the power check.
- Wire it from the Wiring steps, with the board unplugged.
- Flash the hardware test sketch from the browser to confirm the wiring.
- Generate the project code. Take it into the IDE when you want to restructure it, add your own libraries or keep it in version control.
- When you change the hardware, change it in Soldr first ("use an OLED instead of the LCD"), so the wiring, the power check and the code stay in step.
More on the safe order of steps: using AI to write Arduino code without frying boards.
Is the code yours to keep?
It's a normal Arduino sketch. Copy it, download it, edit it, keep it in your own repository. Nothing in it depends on Soldr to run.
Parts from the example
- ESP32-DEVKITC development board
- DHT22 temperature and humidity module
- 0.96 inch OLED display, 128x64 I2C
Tools: the online Arduino IDE and the AI-native IDE for hardware. Getting started: how to use Soldr.
Questions
Can I use Soldr's code in the Arduino IDE?
Yes. Copy or download the sketch. The reply names the board setting and the libraries to install from the Library Manager.
Does Soldr replace the Arduino IDE?
It doesn't have to. Soldr designs the build and writes a matching sketch; you can compile and flash in the browser or carry on in the IDE.
Why won't my IDE compile code that Soldr compiled?
Usually a different board package or library version. Match the versions, or compile in Soldr.
What does it cost?
Questions are free; code and compiles cost credits. Sign in and get 100 credits free.
Design your next build on Soldr, then take the sketch wherever you like.